SpringMVC 简介
1. SpringMVC 的诞生背景
1.1 问题引入
在 SpringMVC 出现以前,如果要在 Spring 中集成 MVC,如果手动使用ApplicationContext对象从容器中获取相应的 Bean,即:应用上下文对象是通过 new ClassPathXmlApplicationContext("applicationContext.xml")方式获取的,于是每次从容器中获取 Bean 时都要编写语句 new ClassPathXmlApplicationContext("applicationContext.xml"),这样的弊端是配置文件被加载多次,应用上下文对象被创建多次;
public class UserServlet extends HttpServlet {
    @Override
    protected void doGet(HttpServletRequest req, HttpServletResponse resp) throws ServletException, IOException {
        ApplicationContext app = new ClassPathXmlApplicationContext("applicationContext.xml");
        UserService userService = app.getBean(UserService.class);
        userService.save();
    }
}
1.2 解决方案
尽管在通用情况下,解决上述问题的方案可能有多种(如使用静态?),但在 Web 项目中我们这样操作:可以使用ServletContextListener监听 Web 应用的启动,令 Web 项目在启动时就加载 Spring 的配置文件,同时创建应用上下文ApplicationContext的对象 app,并将其存储到最大的域servletContext域中,这样,之后就可以在任意位置从域中获取应用上下文对象了。
创建监听器
package com.itheima.listener;
import org.springframework.context.ApplicationContext;
import org.springframework.context.support.ClassPathXmlApplicationContext;
import javax.servlet.ServletContext;
import javax.servlet.ServletContextEvent;
import javax.servlet.ServletContextListener;
public class ContextLoaderListener implements ServletContextListener {
    @Override
    public void contextInitialized(ServletContextEvent servletContextEvent) {
        ApplicationContext app = new ClassPathXmlApplicationContext("applicationContext.xml");
        // 将 app 存储到 ServletContext 域中
        ServletContext servletContext = servletContextEvent.getServletContext();
        servletContext.setAttribute("app", app);
        System.out.println("Spring 容器创建完毕......");
    }
    @Override
    public void contextDestroyed(ServletContextEvent servletContextEvent) {
    }
}
web.xml 中配置监听器
<listener>
    <listener-class>com.itheima.listener.ContextLoaderListener</listener-class>
</listener>
新方式创建 Servlet
package com.itheima.web;
import com.itheima.service.UserService;
import org.springframework.context.ApplicationContext;
import javax.servlet.ServletContext;
import javax.servlet.ServletException;
import javax.servlet.http.HttpServlet;
import javax.servlet.http.HttpServletRequest;
import javax.servlet.http.HttpServletResponse;
import java.io.IOException;
public class UserServlet extends HttpServlet {
    @Override
    protected void doGet(HttpServletRequest req, HttpServletResponse resp) throws ServletException, IOException {
//        ServletContext servletContext = req.getServletContext(); // 写法 1
        ServletContext servletContext = this.getServletContext(); // 写法 2
        ApplicationContext app = (ApplicationContext) servletContext.getAttribute("app");
        UserService userService = app.getBean(UserService.class);
        userService.save();
    }
}
上述代码可从解耦的角度进一步优化,参见 https://www.bilibili.com/video/BV1WZ4y1H7du?p=75 。
1.3 SpringMVC 的出现
对于上面手工编写的代码,现在 Spring 框架替我们做了:Spring 提供了一个监听器ContextLoaderListener就是对上述功能的封装,该监听器内部加载 Spring 配置文件,创建应用上下文对象,并存储到ServletContext域中,同时提供了一个客户端工具WebApplicationContextUtils供使用者获得应用上下文对象。
现在我们需要做的只有两件事:
在 web.xml 中配置
ContextLoaderListener监听器;- pom.xml
<dependency> <groupId>org.springframework</groupId> <artifactId>spring-web</artifactId> <version>5.0.5.RELEASE</version> </dependency>- web.xml
<!--  全局初始化参数  -->
<context-param>
    <param-name>contextConfigLocation</param-name>
    <param-value>classpath:applicationContext.xml</param-value>
</context-param>
<!--  配置监听器  -->
<listener>
    <listener-class>org.springframework.web.context.ContextLoaderListener</listener-class>
</listener>
使用
WebApplicationContextUtils获得应用上下文ApplicationContext对象。application = WebApplicationContextUtils.getWebApplicationContext(servletContext); Object obj = application.getBean("id");
2. SpringMVC
SpringMVC 是一套基于 Java 的实现 MVC 设计模型的请求驱动类型的轻量级 Web 框架,属于 SpringFrameWork 的后续产品,已经融合在 Spring Web Flow 中。
SpringMVC 已经成为目前最主流的 MVC 框架之一,并且随着 Spring3.0 的发布,全面超越 Struts2,成为最优秀的 MVC 框架。它通过一套注解,让一个简单的 Java 类成为处理请求的控制器,而无须实现任何接口。同时它还支持 RESTful 编程风格。
不同框架充当前端控制器的技术是不一样的:SpringMVC 是 Servlet,struts2 是 Filter。
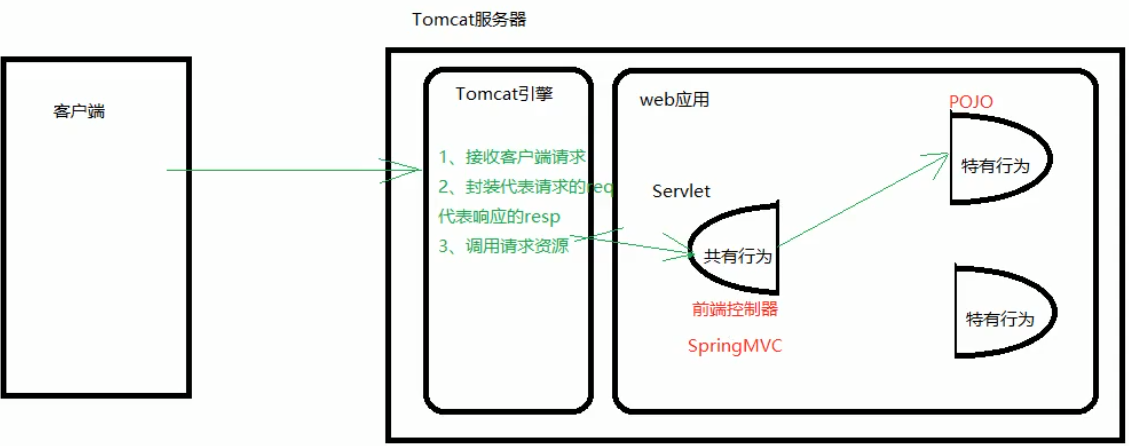
2.1 SpringMVC 流程图示
手写版
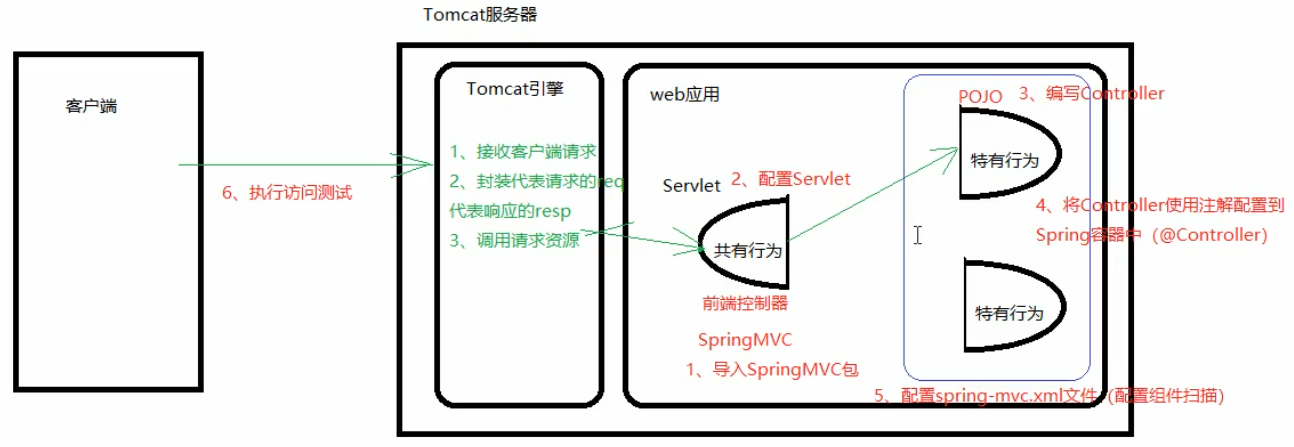
23 手写版+开发步骤
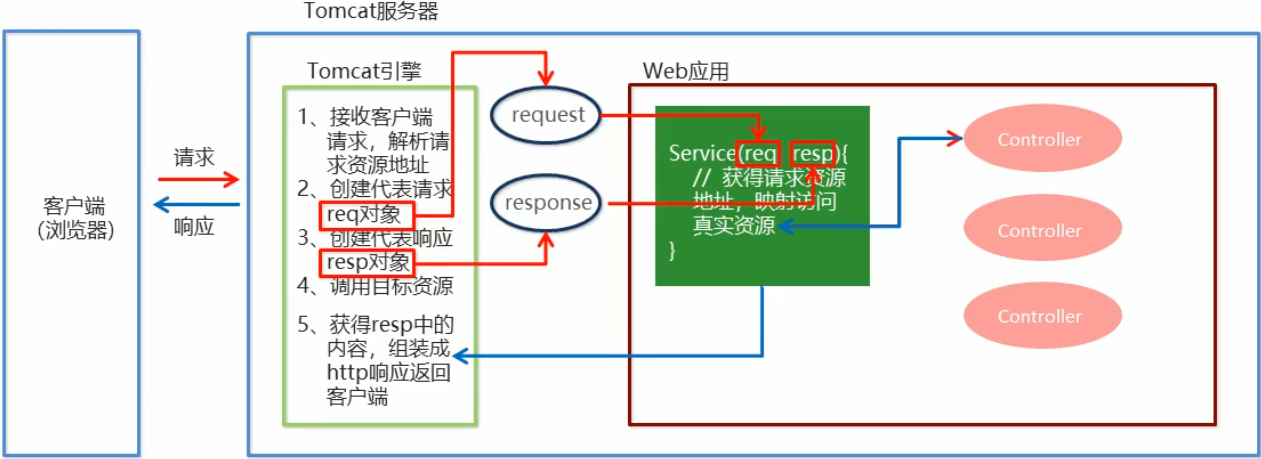
24 PPT 版
25
2.2 SpringMVC 快速入门
需求:客户端发起请求,服务器端接收请求,执行逻辑并进行视图跳转。
开发步骤:
- 导入 SpringMVC 相关包坐标;
- 在 web.xml 中配置 SpringMVC 核心控制器 DispatcherServlet;
- 创建 Controller 类和视图页面;
- 使用注解配置 Controller 类及其中业务方法映射的资源地址(@Controller);
- 配置 SpringMVC 的核心配置文件 spring-mvc.xml 的组件扫描;
- 客户端发起请求测试。
示例:
pom.xml
<dependency>
    <groupId>org.springframework</groupId>
    <artifactId>spring-webmvc</artifactId>
    <version>5.0.5.RELEASE</version>
</dependency>
web.xml
<!--  配置 SpringMVC 的前端控制器  -->
<servlet>
    <servlet-name>DispatcherServlet</servlet-name>
    <servlet-class>org.springframework.web.servlet.DispatcherServlet</servlet-class>
    <init-param>
        <param-name>contextConfigLocation</param-name>
        <param-value>classpath:spring-mvc.xml</param-value>
    </init-param>
    <load-on-startup>1</load-on-startup>
</servlet>
<servlet-mapping>
    <servlet-name>DispatcherServlet</servlet-name>
    <url-pattern>/</url-pattern>
</servlet-mapping>
UserController.java
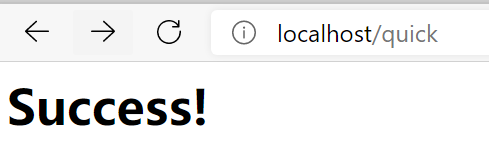
package com.itheima.controller;
import org.springframework.stereotype.Controller;
import org.springframework.web.bind.annotation.RequestMapping;
@Controller
public class UserController {
    @RequestMapping("/quick")
    public String save() {
        System.out.println("Controller save running...");
        return "success.jsp";
    }
}
success.jsp
<%@ page contentType="text/html;charset=UTF-8" language="java" %>
<html>
    <head>
        <title>Title</title>
    </head>
    <body>
        <h1>Success!</h1>
    </body>
</html>
spring-mvc.xml
<?xml version="1.0" encoding="UTF-8"?>
<beans xmlns="http://www.springframework.org/schema/beans"
       xmlns:xsi="http://www.w3.org/2001/XMLSchema-instance"
       xmlns:context="http://www.springframework.org/schema/context"
       xsi:schemaLocation="http://www.springframework.org/schema/beans http://www.springframework.org/schema/beans/spring-beans.xsd
                           http://www.springframework.org/schema/context http://www.springframework.org/schema/context/spring-context.xsd
">
    <!--  Controller 的组件扫描  -->
    <context:component-scan base-package="com.itheima.controller"/>
</beans>
输出
访问页面
26 控制台输出
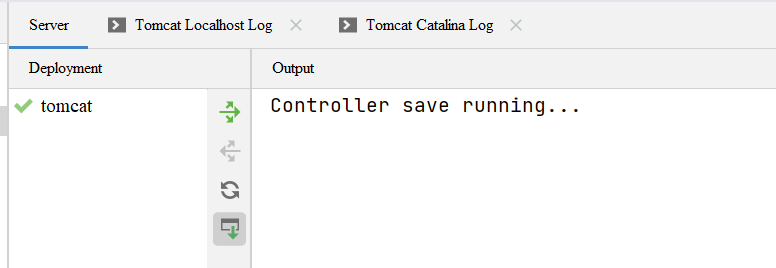
27
2.3 快速入门案例详解
2.3.1 @RequestMapping注解
@RequestMapping注解用于建立请求 URL和处理方法之间的对应关系。
位置:
- 类上:请求 URL 的第一级访问目录。此处省略的话,表示应用的根目录。
- 方法上:请求 URL 的第二级访问目录,与类上标注的一级目录一起组成访问的虚拟路径。
属性:
value:用于指定请求的 URL。其和path属性的作用一样。method:用于指定请求的方式params:用于指定限制请求参数的条件,该参数支持简单的表达式。注意,请求参数的 key 和 value 必须和配置的一模一样。示例:
- params = {"accountName"},表示请求参数必须有 accountName
- params = {"money!100"},表示请求参数中 mooney 不能是 100。
2.3.2 MVC 命名空间的引入
命名空间:
xmlns:context="http://www.springframework.org/schema/context"
xmlns:mvs="http://www.springframework.org/schema/mvc"
约束地址:
http://www.springframework.org/schema/context
http://www.springframework.org/schema/context/spring-context.xsd
http://www.springframework.org/schema/mvc
http://www.springframework.org/schema/mvc/spring-mvc.xsd
2.3.3 组件扫描
SpringMVC 基于 Spring 容器,所以在进行 SpringMVC 操作时,需要将 Controller 存储到 Spring 容器中,如果使用@Controller注解标注的话,就需要使用<context:component-scan base-package="com.itheima.controller" />将相应的类纳入 spring 扫描的范围之内。
2.3.4 视图解析器
SpringMVC 有默认组件配置,默认组件都是DispatcherServlet.properties配置文件中配置的,该配置文件地址为org/springframework/web/servlet/DispatcherServlet.properties,该文件中配置了默认的视图解析器,如下:
org.springframework.web.servlet.ViewResolver=org.springframework.web.servlet.view.InternalResourceViewResolver翻看该解析器源码,可以看到该解析器的默认设置,如下:
REDIRECT_URL_PREFIX = "redirect:"  --重定向前缀
FORWARD_URL_PREFIX = "forward:" --转发前缀(默认值)
prefix = "" --视图名称前缀
suffix = "" --视图名称后缀
2.3.5 微总结
SpringMVC 的相关组件:
- 前端控制器——
DispatcherServlet - 处理器映射器——
HandlerMapping - 处理器适配器——
HandlerAdapter - 处理器——
Handler - 视图解析器——
ViewResolver - 视图——
View
SpringMVC 的注解配置:
请求映射注解:
RequestMapping视图解析器配置:
REDIRECT_URL_PREFIX = "redirect:"
FORWARD_URL_PREFIX = "forward:"
prefix = ""
suffix = ""
2.4 SpringMVC 的执行流程(理解即可)
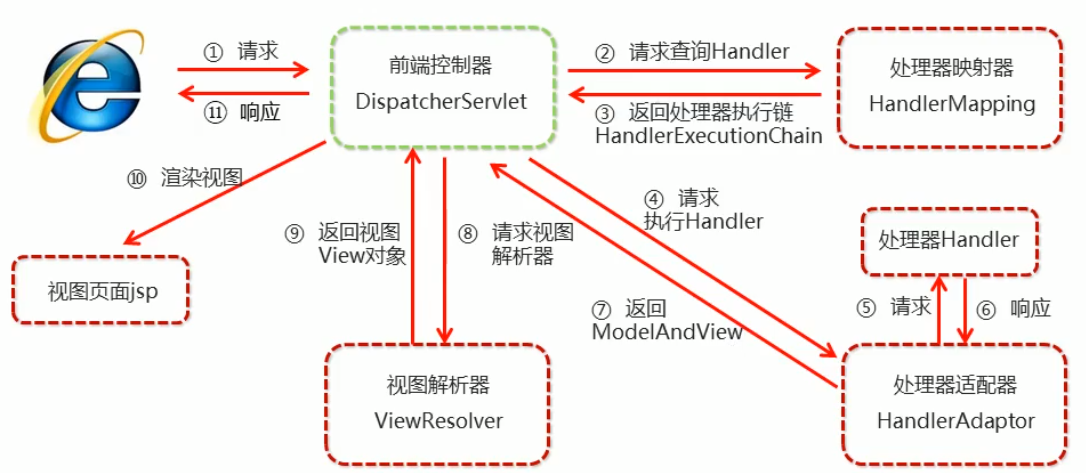
文字描述:

更新日志
a357e-于899db-于eedbf-于47fa5-于c9215-于75141-于730b3-于1bd96-于0e6a3-于c39bd-于